
Giant Terrarium Build
I don’t think my obsession with greenhouse cabinets is any sort of secret. What’s not to love? My plants are happier, my lights and fans are set to timers, and I don’t have to worry about the sufficiency of the humidity. Everyone wins. Recently, however, one of my most beloved plants outgrew my shorter Fabrikör cabinet, and I panicked a little. Philodendron verrucosum is a special plant to me, simply because it’s beautiful and I wouldn’t even want to think about finding a replacement for it should something happen. I set out to purchase a nice, tall Detolf cabinet where my Philodendron verrucosum and eventually my Philodendron melanochrysum can grow several more feet before I need to be concerned. I don’t cut my plants often. Lately I’ve been more interested in hand pollination (hopefully I’ll have some success stories to share soon), but I know I will eventually have to cut these two plants. My goal, particularly with my juvenile Philodendron melanochrysum is to get some mature leaves. This’ll take a while, but I’m in it for the long haul, so no matter. See below for Philodendron verrucosum outgrowing her pole and her greenhouse cabinet.

I knew immediately after setting up the Detolf that this wasn’t the vision I had in mind. There was nothing wrong with it, but it did seem like a lot of wasted space in the upper part of the cabinet. I was also unsatisfied with the way the wires looked even after I had cable managed them. I found some lights on amazon, which I’ll discuss later, that have nice adhesive strips and adhere to the shelves or ceiling of the cabinet. These lights have been nearly perfect for my terrarium, but I didn't love them for the stripped down version of the Detolf that I originally tried. You can barely see in the photo below that the wires couldn’t be completely hidden.

Since this setup wasn’t working for me, I started to research some possible alternatives that could satisfy both me and my plant. The objectives were:
Room to grow
More pleasing aesthetically
No wasted space
I also wanted the look to be more natural, if possible
I perused the Instagram of @ikeagreenhousecabinet and found bits and pieces I liked about several different cabinets. I’ll include them at the end of the post. I ended up with a supply list that was pretty simple, although I did need to visit several hardware stores to get all the supplies. The store that carried the pond foam didn’t carry the specific silicone I needed, etc.
Detolf Cabinet … $60
GREAT STUFF Black Pond & Stone Expanding Spray - 4 cans (I needed 5) … $34
GE Silicone Caulk Clear - 10 oz. qty. 4 … $20
Coconut Fiber … $2
Round Peat Pots and Nursery Pots - various sizes … $0 I had these sitting around
Cork Bark … $15 for 4 chunks. I also just grabbed some bark from outside
Mosthink LED Plant Grow Light Strips - Full Spectrum - 2 pairs - … $40 on Amazon
AC Infinity Multifan S1 … $11
Moss … $10 on Amazon
Drill
Zip Ties
Caulk Gun
Razor Blade
Gloves and Mask
————————————————————
Total for items I didn’t already have … $192
This doesn’t include the cost of the plants, of course, with the exception of the moss. I’ll add more moss over time, but I’m waiting to see how the current moss does regarding growth rate and light exposure. Also excluded from this list are the potting mix and the amendments that I used.
I saw that some builders have removed the metal cages inside the Detolf when making their terrariums. I chose not to remove them because was my first bigger build, and I wasn’t fully confident that I could ensure the support of the glass walls without the cages. The appearance of them doesn’t bother me, and I reasoned that I can always snip them out with wire cutters later of I decide that I don’t want them.
I also haven’t added weather stripping to the door panel yet. I originally didn’t think I would, but as time goes by, I think it would improve the humidity retention.
I began with an assembled cabinet, so I’ll be skipping the steps pertaining to assembly.
Step 1:
Put on the gloves and the mask. For real, just put them on. I started with the cabinet upright. I placed one of the shelves that came with the cabinet in the floor area, and a second as a wall across the front of the cabinet and used the silicone caulk to secure the pieces of glass into place. This will serve as a receptacle for the potting mix which will hold my Philodendron verrucosum and other plants. I was careful to ensure that the silicone and glass were completely sealed in every area. Once the silicone was dry, I put the cabinet on its back to begin the next step.


Step 2:
I started applying the four cans of pond foam to the back panel of the glass. There are two things I would do differently about this step. First, I would buy a fifth can of foam. Second, I would not apply the foam to the wall behind the retaining piece of glass. It ended up being useless. I didn’t cover it with coconut fiber, and it was just a waste of foam.
One of the four cans had a broken spout, so the gloves were essential. The long spout screws onto the top of the can and ideally the product comes out of the spout’s end, several inches away from your hand. I ended up having to spray the broken one directly from the can which was really messy. This product will ruin clothes and surfaces, so that wasn’t fun. Seriously, wear the gloves.
After all four cans were sprayed into the cabinet, I began placing my pots and some of the pieces of cork bark. This is when another can of foam would have been useful. I feel like I could have been more creative with the layout inside the cabinet if I’d had more product with which to build.


Step 3:
This step could definitely be done later, but I was impatient so I decided to install the lights while I waited for the foam to dry. I started by drilling a hole in the top of the cabinet with the largest drill bit I have. I toyed with the idea of installing the remaining glass shelf on the ceiling of the cabinet in Step 1, but I ultimately decided against it because I knew I would need to drill for the lights and fan. The placement of the hole will depend on the lights you buy, of course. I bought two sets of lights for this cabinet. Each light has two LED strips, and they came with double sided adhesive to stick the LED strips to the surface of your choosing. I drilled the hole for my cables to the side and strung the cables through the hole where they could be hidden behind the cabinet.


I tied the cables into a knot temporarily because I knew I’d have to install the fan later.
Step 4:
Dry for 24 hours. It’s annoying and waiting was so hard, but it’s for the best. I told myself a hundred times that it would be no big deal if I went ahead to the next step before the 24 hour dry time, but it was all lies. It wouldn’t have been fine, and I knew it enough somewhere inside my head to just leave it alone for a while.
Step 5:
In 24 hours, it’s time to start applying the coconut fiber over the top of the foam. For this step you could also use sphagnum moss or cork bark. I chose coconut fiber because it’s more environmentally friendly than sphagnum moss and ridiculously cheap compared to cork bark. The few pieces of cork bark I bought as accent pieces were $15. For perspective they’re about 3” x 3”. I’m sure there’s a way I could buy in bulk for lower cost, but I didn’t see a reason to look into it since I could cover the entire surface with coconut fiber for about $2.
I used the GE silicone caulk that was recommended to me by a friend and began applying the coconut fiber in small pieces so I had more control over the final look. There were some areas that were recessed, and I wanted to keep the dimension in these areas rather than fill them with an excess of coconut fiber.
I have heard others mention that they use a razor blade and remove the surface of the hardened foam before applying the coconut fiber. I opted against this because my coconut fiber, though I used window basket liners, was flattened into sheets and compressed. For this reason, the fibers weren’t loose like they are when I normally buy them, and I felt confident that they would stick without too much trouble or mess. I would’ve preferred the coconut fiber sheets that I normally buy, but my local shop has been out of stock. I will update if there’s an issue, but so far the window box coconut fiber has stayed in place well.


I had realized prior to this point that I didn’t love the placement of the large, clear nursery pot that was intended to hold my Rhipsalis paradoxa. Not only do I wish I had put the pot and bark higher up, but I wish that I was able to slant the pot toward the lights so I’d feel more confident about the ability to hold the plant. This is where the shortage of foam really shows. If I’d had another can, I would have been able to secure the heavy bark and the nursery pot where I wanted them.
Step 6:
Wait again, and this time I mean it even more than the last. Give that Silicone 24 hours. Give it more if you can. Go on vacation. I can’t even express how intense the Silicone fumes are, it’s unreal.
Guess who didn’t wait 24 hours? Me.
I started putting my plants in as soon as the silicone was dry, which isn’t very long according to the label. Maybe 2 hours? Well, this was a mistake. I lost a begonia that I’d had for over 2 years to the fumes, and side note a brand new fern leaf begonia to one of the lights falling off the ceiling and smashing it to smithereens. The lights and their adhesive were in this cabinet back when it was a regular Detolf with glass shelves. I had pried the lights off with a screwdriver and compromised the stickiness of the adhesive. I planned to use some Gorilla Tape I had bought to reinforce the stickiness, but I went to bed on the second night forgetting to add the extra tape. I had untied the knot of cables when I put the cabinet upright, so the light was able to fall down, unfortunately. I woke up with a smashed fern leaf. Because I don’t think it’s necessary at all if you’re using the adhesive that comes with the lights ONE time, I did not include the Gorilla Tape on the list of supplies. That one was my bad.
Step 7:
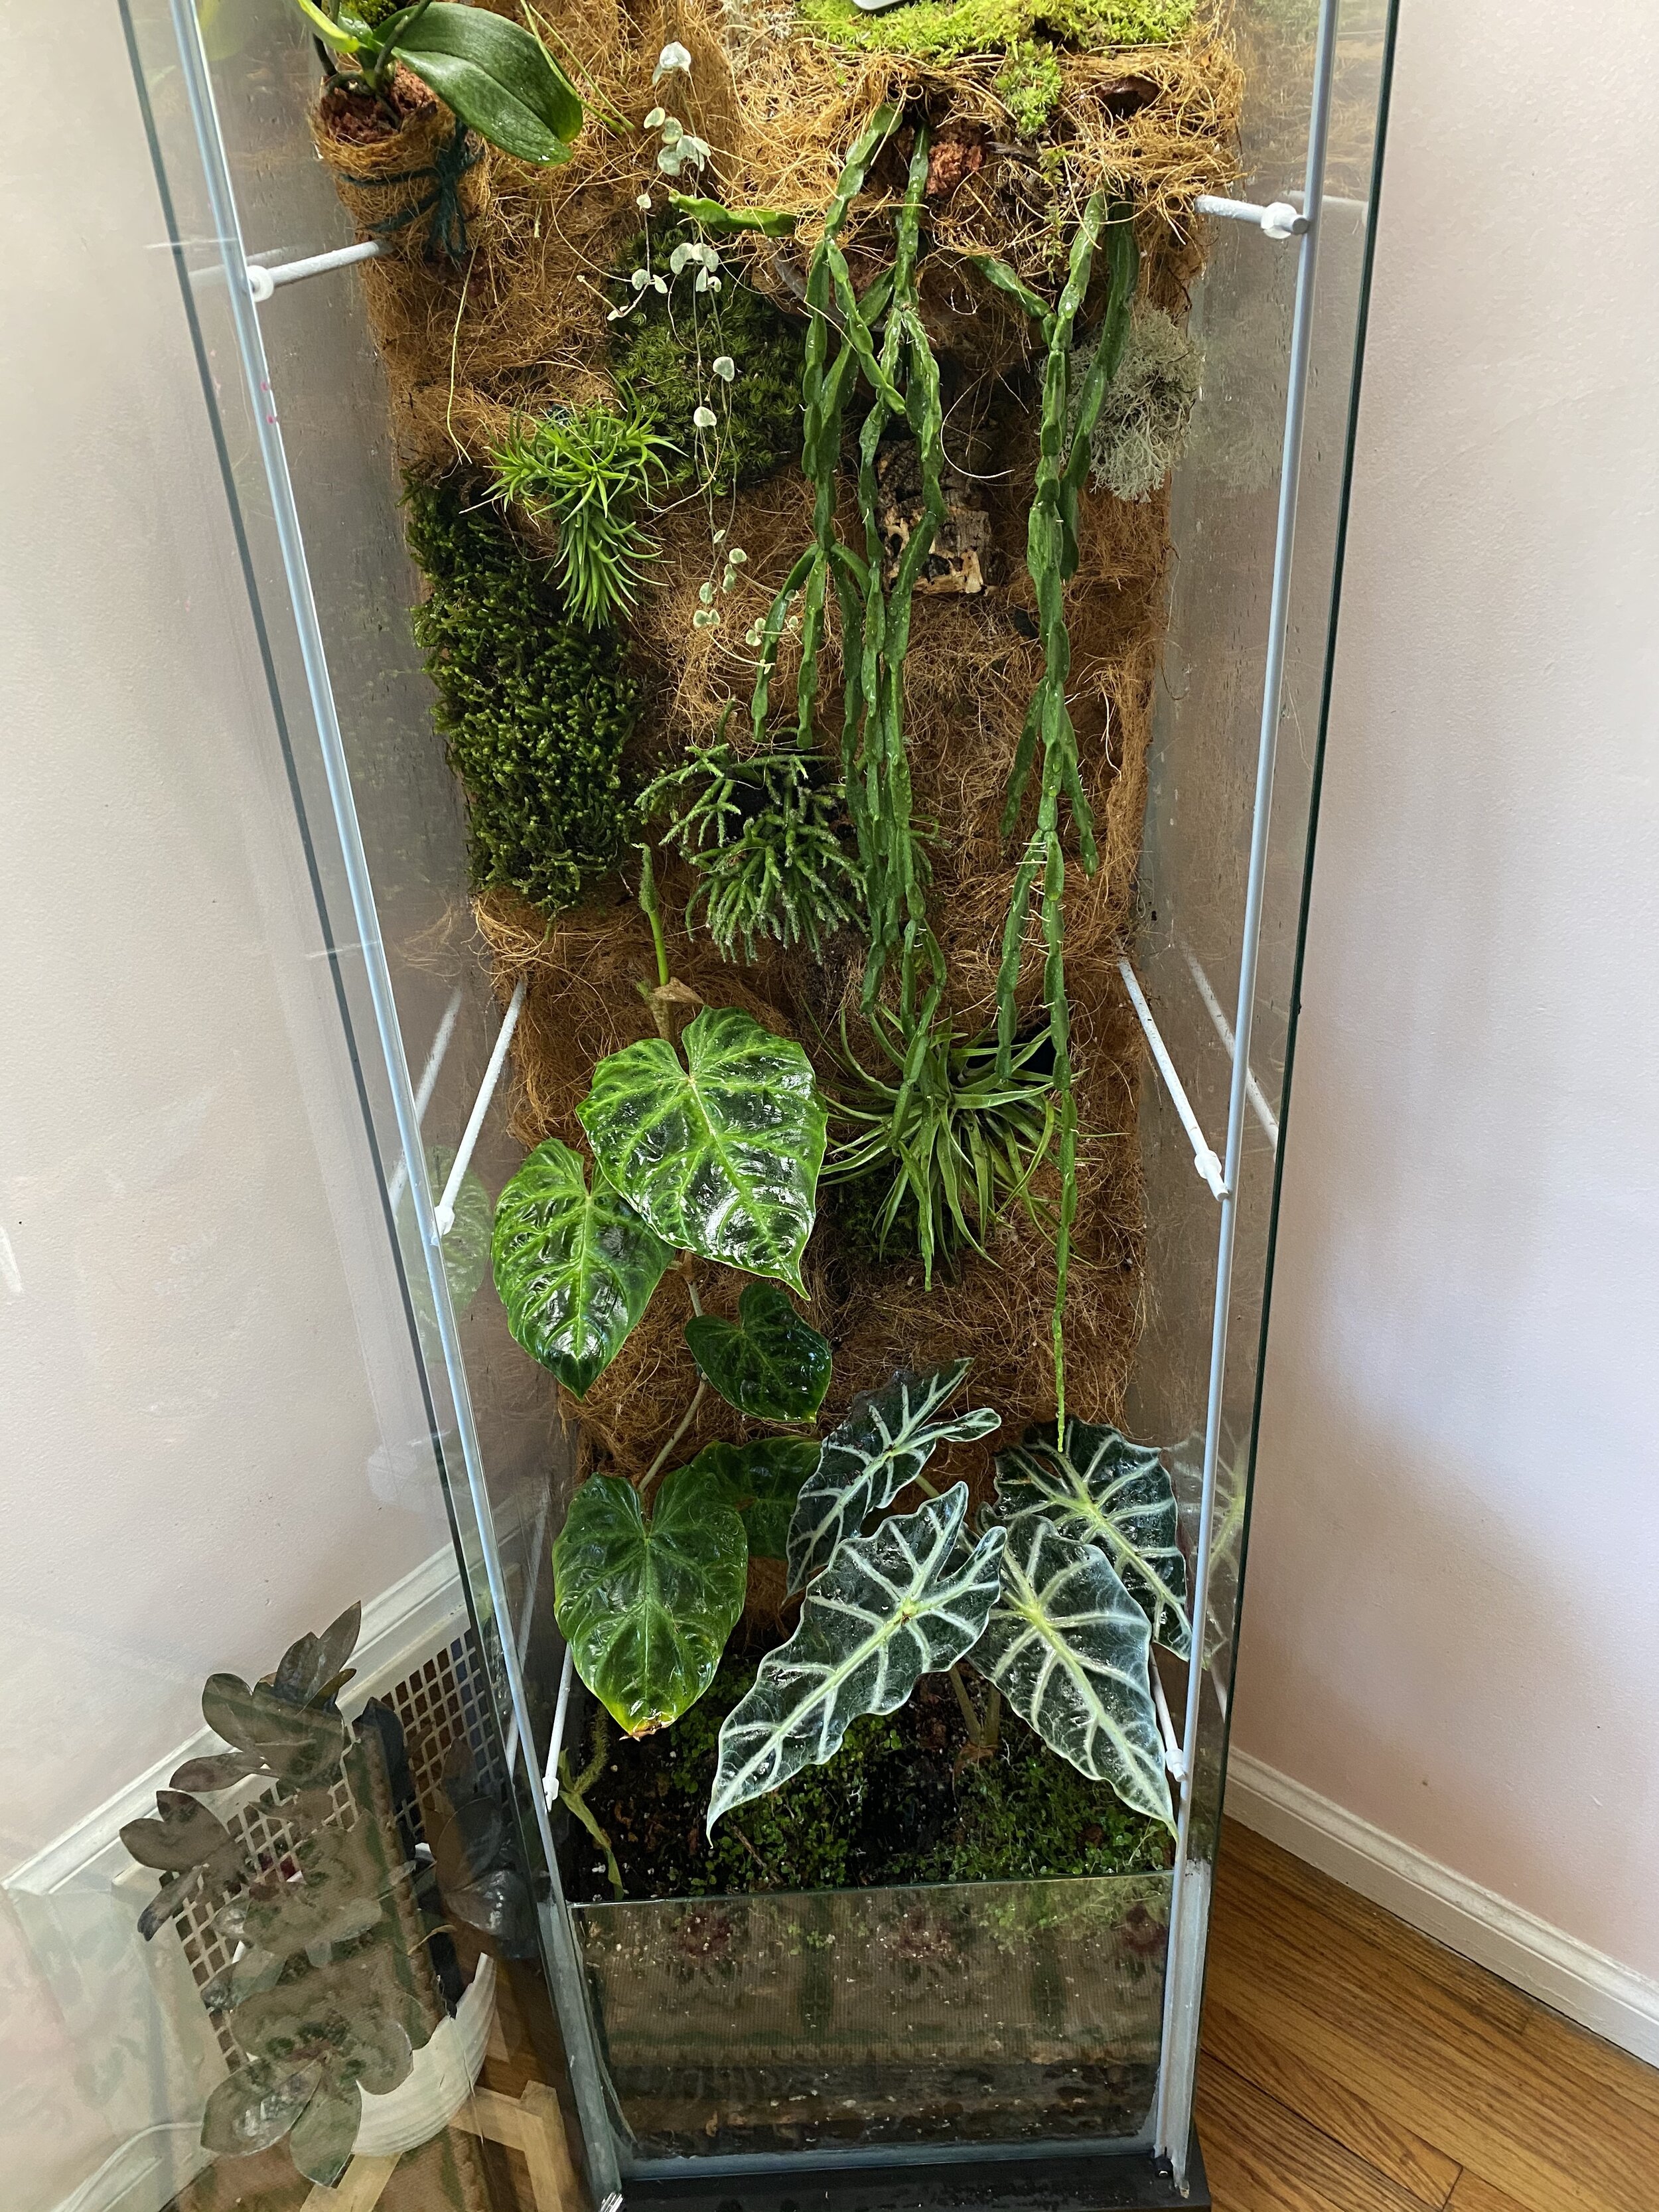
Now that waiting responsibly is out of the way, it’s time to start planting. I began with about 2 inches of horticultural charcoal in the bottom of the cabinet. Charcoal works like a filter against bacteria and mold, or any other nastiness that might sit at the bottom of the enclosed cabinet. If any water makes it through to the bottom where it might sit, the charcoal will help neutralize it, within reason. It’s still going to be critical to keep an eye on the moisture levels in the potting mix as well as the entire cabinet (air circulation from the fan will help), but the charcoal provides a good start. After the charcoal, I added potting mix that I prepared myself to be well draining and suitable for my Philodendron verrucosum, which ultimately is who this cabinet was intended to house.


Step 8:
Plant!
This is the fun and stressful part. I wanted to create the perfect layout inside, but I’ve changed my mind so many times. I quickly learned that there wouldn’t be enough space for my Philodendron melanocrysum. The priorities became my Rhipsalis paradoxa, and my Philodendron verrucosum, as previously mentioned.


I added the fan last, secured it with zip ties, and it’s finished…or is it?

What I Learned:
This wasn’t an easy one. I never expected it to be easy, of course. I knew the building would be new and interesting, but what I didn’t expect were the challenges I encountered after all the building was finished. Even today, more than two weeks after I built this cabinet, I can still smell the Silicone. I lost the leaf from the verrucosum that was emerging when I planted it in the cabinet, and I lost two begonias. If I could go back, I would change a few things. I don’t even need to bother with a list or bullet points on this one. I wish I had been more patient. Waiting is annoying and I wanted instant plant gratification, so I went for it.
In the future, I’ll add more green moss, add the Spanish moss I ordered, and add weather stripping along the door. This cabinet doesn’t hold humidity like my Fabrikör units do. I occasionally move my portable humidifier into the Detolf, but due to the spaces between the door and the sides of the cabinet, it doesn’t hold well. I plan to add an additional fan near the bottom of the cabinet to help with air circulation, as well as another grow light along the side of the cabinet to help my Alocasia.
Plants:
Philodendron verrucosum
Rhipsalis Paradoxa
Soleirolia soleirolii - Baby’s Tears
Rhipsalis baccifera
Orchid phalaenopsis
Mosses and Lichen
Hoya nummularioides
Hoya retusa
Ceropegia woodii variegata - Variagated String of Hearts
Tillandsia ionantha ‘Mexico’
Various Air Plants
Inspiration:
You’ll need access to Instagram or YouTube to appreciate the full glory of what these plant lovers have created. First, @the_junglebook_shelf inspired me with some gorgeous terrariums and with kindness.
@ikeagreenhousecabinet never ceases to amaze and overwhelm me with inspiration for projects like this one, and @robinschoutart is brilliant. Thank you for providing an outlet for the plant-crazed of the world!
I read about and watched the YouTube videos by @tropicalseductions and learned a lot. I believe she links to her YouTube from Instagram, so you can check out her videos there.
Finally, @pictusplantae created a gorgeous detolf cabinet that inspired me. I completely agree that it wouldn’t be possible to buy a terrarium of this size without spending a ridiculous sum.
I also watched at least a hundred different videos by manufacturers of pond foam, so shout out to the pond foam companies of the world.
I love projects and creating, so I’m grateful to all of the above plant artists who helped show me the possibilities.
Finally…
I think most of you know this by now, but I also love talking about plant projects, plants, creating, all of it. Comment below, email me, or find me on Instagram if you want to chat about this or any other plant project. I’d be more than delighted.